Have you ever been in a situation where your SD card suddenly becomes RAW, causing you to lose all your precious data? If you’re reading this article, chances are you have. Since SD cards are the most commonly used data storage device in cameras, smartphones, and other electronic devices, this problem is not uncommon. However, don’t worry, your data is not lost forever. Just because the file system on your memory card became RAW does not mean you have lost access to your data permanently. In this article, we will discuss what a RAW SD card is, why data recovery from a RAW SD card is necessary, and how to recover data from a RAW SD card.
Important: It is crucial to immediately stop using a memory card once its file system becomes RAW. Continued use, as well as some methods of fixing the problem, can lead to overwriting and permanently erasing the data stored on your memory card, including important photos and videos. Therefore, it is highly recommended to avoid any further use of the card until data recovery is performed to prevent any permanent data loss.
Understanding RAW SD Cards: Causes and Symptoms
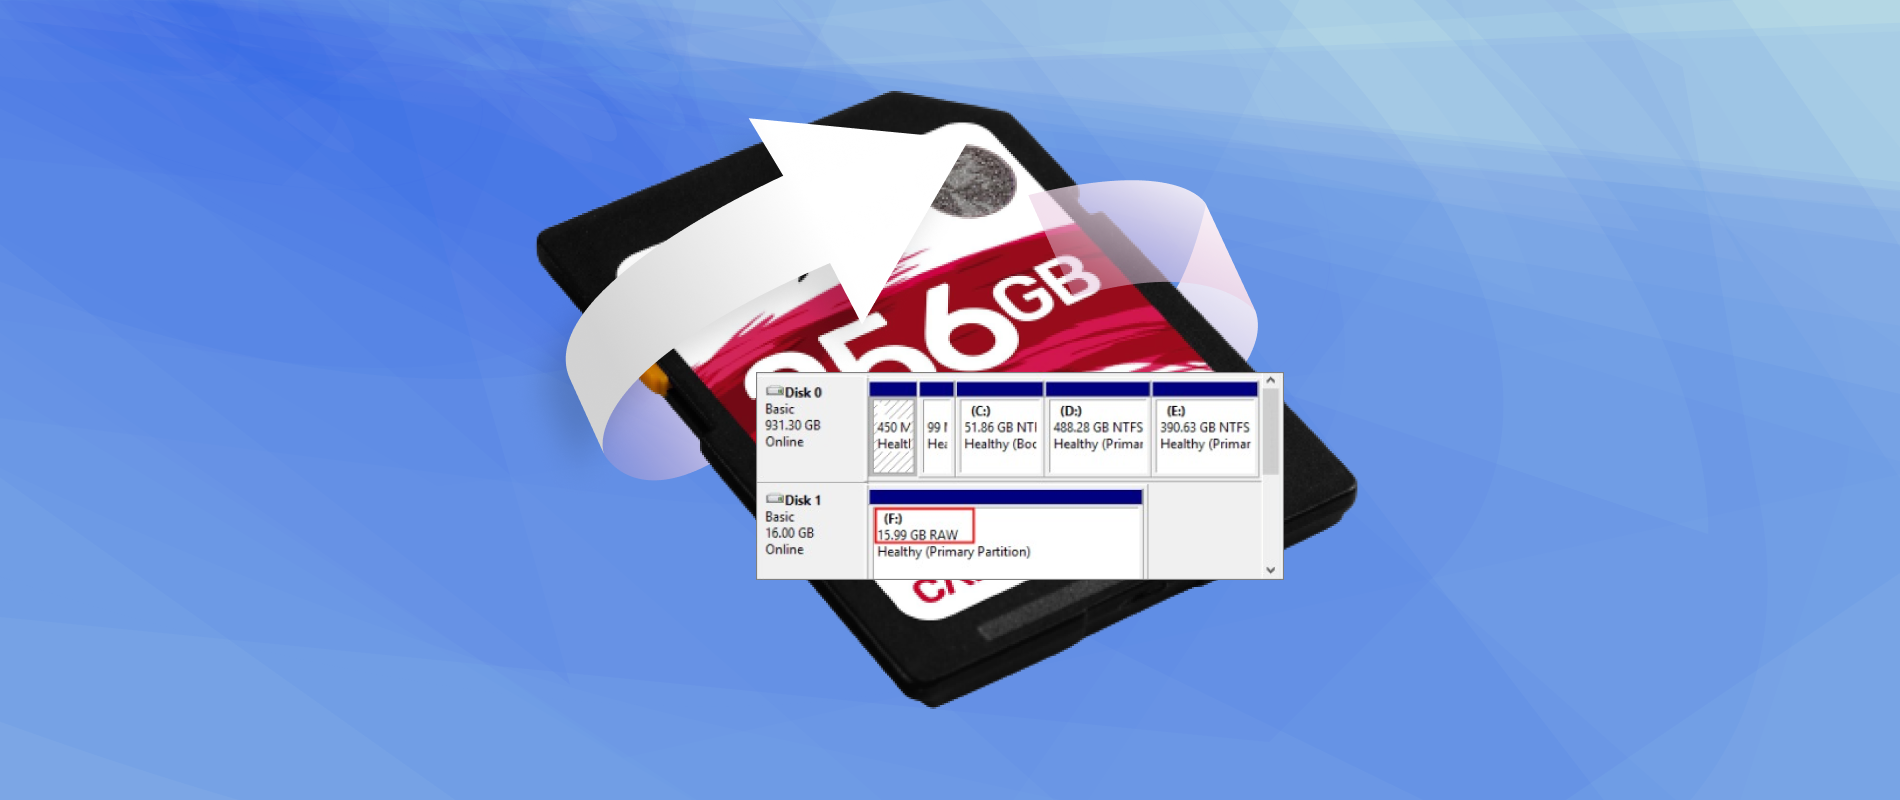
Before beginning the data recovery process, it’s important to understand what a RAW SD card is. A RAW SD card is a storage device that either lacks a file system or has a corrupt file system.
To clarify, the file system is responsible for organizing and managing the data on the SD card. When the file system is corrupt or missing, your computer or device cannot read the SD card, rendering it RAW.
Unless your SD card is brand new and hasn’t yet been formatted with a file system, there are several reasons why the file system may become damaged or lost, resulting in the SD card becoming RAW. Some common reasons include:
- File system corruption: The file system on an SD card can become corrupted due to various reasons, such as improper ejection of the SD card, sudden power loss, virus or malware infection, or physical damage to the card.
- Incomplete formatting: Sometimes, if an SD card is not formatted properly, or if the formatting process is interrupted or incomplete, it can result in a RAW SD card.
- Bad sectors: When an SD card has bad sectors, it can become RAW. Bad sectors are physical defects on the storage medium that prevent data from being written or read correctly.
- Physical damage: If an SD card is physically damaged due to mishandling, dropping, or exposure to water or extreme temperatures, it can become RAW.
- Outdated or faulty drivers: If the drivers that manage the SD card reader on a computer or other device are outdated or faulty, it can cause the SD card to become RAW.
Next, let’s address the symptoms.
Signs that indicate your SD card is RAW:
- SD card not recognized by the device
- Error message “SD card is not formatted. Do you want to format it now?”
- Files on the SD card are inaccessible or missing
- The device shows the SD card as having zero or very low storage capacity.
A Step-by-step Raw SD Card Recovery Guide
Now that we’ve covered what a RAW SD card is and how to identify if your SD card is RAW, let’s move on to the process of recovering data from a RAW SD card.
Before diving into the steps, it’s essential to have the necessary tools to ensure a successful recovery process. Here are the tools required for recovering data from a RAW SD card:
- A computer with an SD card reader. Some laptops and PC cases have built-in card readers. However, if yours doesn’t, you will need an external card reader.
- Reliable data recovery software. But what features should the software have to successfully complete our task? We believe there are three main ones. Firstly, it should be able to scan devices without a file system (RAW). Secondly, it should support as many file signatures as possible to recover every file, regardless of its type. Thirdly, the software should be either free or offer a generous trial plan. In this article, we will introduce you to a software tool that has all these features.
- A backup device to save the recovered data. Don’t save the recovered data back to the memory card you’re trying to recover files from. Instead, use another device such as the internal memory of your PC or laptop.
Important: The method described below is not dependent on the type or brand of the memory card. This means that you can successfully recover data from RAW cards from SanDisk, Lexar, Panasonic, and even SmartBuy, as well as card types such as xD, XQD, CF, CFast, CFExpress, and others.
For the data recovery process, we recommend using Disk Drill, a software tool that meets all the criteria mentioned earlier and offers a user-friendly interface. One of the advantages of Disk Drill is that it offers a free trial version, which allows you to recover up to 500 megabytes of data for free on Windows machines.
Here is how you can recover data from RAW SD card using Disk Drill:
- Download and install Disk Drill from the official site. Grant the software administrator-level access so that it can perform the recovery. Run the software and give it permission to access your storage devices.
- Connect your RAW SD card to your computer using a card reader or by connecting a device that contains the SD card.
- Once the Disk Drill software is running, select your SD card from the list of drives displayed on the home screen. Note that you might see your card reader listed instead of the actual raw SD card.
- Click on the Search for lost data button to initiate the scan. Disk Drill will start scanning your SD card for all the lost files.
- Once the scanning process is complete, Disk Drill will present you with a list of the files it has found. You can review all the found items by clicking the Review found items button at the top right corner of the window.
- Place a checkmark on the left of the files you’d like to recover. If you only want some specific files, you can also review them to see if they have already been discovered.
- When you have selected all the files you want to recover, click on the Recover button at the bottom left of the window. Choose a destination to save the recovered data. Don’t set the SD card itself as the destination for the recovered files, as that would overwrite the other files still being found. Instead, use a location on the computer to store the saved files.
- Once Disk Drill completes its recovery, it will offer to Show recovered data in Explorer. Select it to check out Disk Drill’s results with File Explorer.
Keep in mind that while your recovered files are now safely available at a different location, your RAW SD card still needs to be fixed so you can use it in the future.
How to Fix RAW SD Card
If you’ve successfully recovered your data, congratulations! Now, let’s discuss how to restore your RAW SD card to its original working state.
In this section, we will cover some potential methods to repair your RAW card. Please note that we will not be discussing methods such as the CMD command CHKDSK, as they do not work with RAW memory cards. If you come across resources that suggest otherwise, we recommend being cautious and seeking information from a more reliable source.
Important: We want to reiterate the importance of prioritizing data security before attempting any repair methods. We recommend using Disk Drill, as described in the previous section, or any other reliable data recovery software to ensure your data is safe and secure. Once you have taken the necessary precautions, you can proceed with the repair methods outlined in this section. By following these methods, you can potentially restore your RAW SD card to its original working state.
Method 1: Repair Partitions on Your RAW SD Card Using TestDisk
TestDisk is a robust open-source data retrieval tool that can assist in recovering lost partitions and repairing RAW SD cards. With TestDisk, you can conveniently restore lost partitions, which are often the cause of SD cards turning RAW.
Follow these steps to use TestDisk for repairing your RAW SD card:
- Begin by downloading and installing TestDisk from the official website. Once the download is complete, extract or install TestDisk onto your computer.
- Connect your RAW SD card to your computer using a card reader or a device containing the SD card. Make sure the SD card is correctly inserted and recognized by your computer.
- Start TestDisk on your computer and choose your RAW SD card from the list of available drives. TestDisk will examine your SD card to establish its structure and locate any missing partitions.
- Choose the partition table type for your SD card. In most instances, the default option – Intel/PC partition – can be selected. This is the most frequently used partition table type for SD cards.
- After selecting the partition table type, TestDisk will analyze your SD card and display its structure. The analysis may take a few minutes, depending on the size of your SD card.
- Once the analysis is complete, TestDisk will present a list of discovered partitions on your SD card. If your SD card has a single partition, select it and move on to the next step. If not, a deeper search may be necessary to locate the missing partition. To restore the lost partition, choose the desired partition and click “Write.” TestDisk will then write the partition table to the SD card, enabling you to access your lost data.
- Safely remove the SD card from your computer and reinsert it to ensure TestDisk’s changes are appropriately saved.
- After reinserting the SD card, it should now be accessible, and you can attempt to access your data. If the aforementioned steps are unsuccessful, you can try running TestDisk in deeper search mode, which might take longer but can occasionally resolve more complex issues.
Note: Before selecting your SD card in TestDisk, ensure that it is unmounted. If you have any doubts or questions, consult the TestDisk documentation or seek expert advice.
Method 2: Format Your RAW SD Card
Formatting your RAW SD card is the quickest way to fix it because it installs a new file system and resolves file system problems. However, formatting will erase all data on the card.
Pro tip: If you’ve already formatted your card using a quick format, you may still be able to recover some data. However, we recommend restoring your data before formatting to avoid any potential loss.
There are three main ways to format your SD card: via the context menu in File Explorer, in Disk Management, and with CMD (DiskPart). You can choose any method you prefer. For this demonstration, we will use CMD and demonstrate the DiskPart method.
Here are the steps to format a RAW SD card using Diskpart:
- Connect the RAW SD card to your computer.
- Open Command Prompt as an administrator.
- Type “diskpart” and press Enter to open the Diskpart command-line utility.
- Type “list disk” and press Enter to see a list of all the disks connected to your computer. Find the disk number that corresponds to your RAW SD card.
- Type “select disk X” (replace “X” with the disk number of your SD card) and press Enter.
- Type “clean” and press Enter to remove all partitions, volumes, and formatting from the SD card.
- Type “create partition primary” and press Enter to create a new primary partition on the SD card.
- Type “format fs=FAT32” and press Enter to format the partition with the FAT32 file system. For a more thorough format, omit the “quick” parameter.
- Type “assign letter=X” (replace “X” with the drive letter you want to assign to the partition) and press Enter.
- Type “exit” and press Enter to exit Diskpart.
- Safely eject the SD card from your computer.
Note: It’s important to recover and store all data before formatting the SD card. Additionally, formatting a drive using the command prompt provides no additional advantages compared to using File Explorer, except in cases where File Explorer is not working or if you prefer command-line tools.